Thursday 14 June 2012

Missionary of pâtisserie

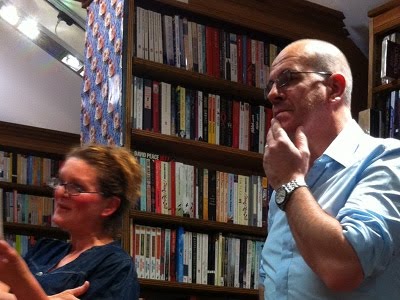
Yesterday evening I made my way over to Bath for another delicious evening at Topping & Co where Richard Bertinet was coming to talk to us about Pastry. Learning from my previous experience, I arrived in good time and secured a seat in the front row with a fabulous view. Richard and sidekick Brett brought boxes and boxes of goodies and busily circulated offering freshly-baked sausage rolls (they were still warm, does that have VAT implications?) and salted caramel brownies on wooden peels. The frenzy of sharing was interrupted by the small matter of a talk and demonstration, and after a short and enthusiastic introduction, it was Richard's turn to take the floor. I think this photo shows him contemplating his recent fun and games donning his radio mike...


 Richard's approach to pastry is to remove the faffing and make things easy. Don't worry about the temperature of your butter, he says. Don't chop it up, he says. Just take it in a block straight out of the fridge and, sandwiched between two papers, wallop it escalope fashion. This keeps it cool but renders it pliable and workable. Now you throw it into your flour and tear it up, then flake it between your fingers. Like breadcrumbs? Nope, just get to a point where there are no bits of butter larger than your fingernail.


 Add in the liquid (in this case, eggs), work in with a scraper and finish on the worktop with your hands. If it feels like something's wrong, take your hands away - the biggest crime at this stage is overworking it. At this stage, you can optionally skate a fine layer of flour onto your worktop with a cheffy flourish before you shape your pastry before resting. Or you can just chuck flour on the front row, it's up to you. Richard passed the greaseproof-wrapped (never sweat-inducing clingfilm-wrapped!) pastry around for us to get an idea of the feel and taste of it.


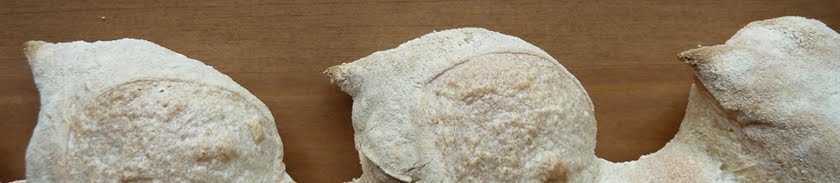
Then he showed us how to make divine tartelettes using cases made from this sweet pastry. First, he showed us lemon curd meringue tartelettes, doing the cheffy business with a flamethrower and only crisping his fingers once or twice.


Mine, all mine!


 He then turned to frangipane tartelettes topped with raspberry and pistachio, and glorious they were too.


 I took a nibble first for the purposes of exposing the frangipane filling, honest.


 Richard enjoys a glass of wine and warm applause.


 Once again, it was a brilliant evening at Topping, a wonderful chance to watch an expert at work, to gain insights and inspiration, to be showered with flour, to try exquisite food. I redeemed my voucher against a copy of the book which Richard then signed, and made my way home with my head full of ideas and plans and thoughts of lemon curd.

Monday 11 June 2012

Figgety do-dahs

There's no way I need any more cookery books. Certainly not any baking books. Not need, no. OK, so I bought two at the weekend. They were on offer, after all...


This one is sweet bakes - essential recipes and is full of recipes for pies, biscuits and puddings. When we got home, Junior leafed through it, ogling the images, and homed in on one recipe. A recipe which I'd rather liked the look of, and which had made Tallboy make Homer Simpsonesque noises in his throat. Fig and chocolate bars it was, then. They looked rather like millionaire shortbread but with a figgy layer of deliciousness instead of the caramel. I know, I'm as surprised as you are that I could be diverted from caramel to fruit, but there you go.

My square tin was a little bigger than that specified, so I jiggled the figures in my head and did nearly 150% of the shortbread and figgy mixture. I kept to the original quantity for the chocolate but that was more because I only had a hundred grams in the cupboard.

I made the shortbread the Clive Mellum way, by whisking soft butter with my fingers, adding sugar and then the flour. The recipe called for soft brown sugar which gave the finished shortbread a lovely golden colour all over. I baked it for 30 minutes and left it to cool.

In the meantime, I chopped up the squidgy dried figs and boiled them with lemon juice, cinnamon and water, applying the whizzing stick after twenty minutes to reduce it all to a sludgy paste.

Assembling was easy, with the figgy layer applied with a trowel spatula, and melted chocolate to cover. Leaving it to cool was torture.


The finished item is delicious, the combination of the short base, the yielding fruit and the smooth chocolate is almost perfect - really happy with how these turned out.

Saturday 14 April 2012

The cake of many colours

'Would you like a Herman?' asked the Chief of All the Numpties, all cheerful and pleased with himself. Unwilling to commit to something without knowing anything about it, I requested further details. 'It's this cake that you grow, you feed it and stir it then you cook part of it and give some away and keep some to feed and stir the next week.' I had a dim memory of mum having something like this when we were little, and more recently I remembered my own nurturing of a ginger beer plant, which produced wonderful ginger beer and elevated our weekly sugar consumption to dizzying and unsustainable heights. Enhanced cake consumption would also probably be rather a bad idea, but I quite fancied giving it a go for a bit.

On the Day of Herman Giving, I arrived at work to discover a cheerful orange carrier bag on my desk, and nestling within it a former vegetable soup tub now housing 100ml or so of beige gloop. This was Herman. He was accompanied by a printed note announcing who he was, forbidding his being placed in the fridge lest he should die, and a schedule for his care, cooking and consumption. I pulled the lid back a smidge and was immediately hit with an aroma which combined beer with bakery. Result!

Throughout the day, as I checked on him, I could see that he was growing and growing. After my return from lunch, having forgotten about him, I heard a rustle from my left hand side. I peered across to my next-door colleague but he wasn't there. The noise must therefore have come from Herman. This spooked me just a little bit. Tentatively, I pulled away the carrier. The soup tub was completely full, and the previously flat lid was alarmingly convex. Without thinking, I broke the seal, and with a commendable pop, the buildup of gas within ejected a quantity of Herman over my hands, the bag, and my desk. I may have squeaked in surprise just a little bit. My colleague-in-opposition squealed like a girl, leaped to his feet, muttered in alarm about 'the spores, the spores!' and ran to open a window.

I left him with his lid at a jaunty angle for the rest of the day, and with no further incidents got him home in one piece. I decanted him into a bowl and covered him with a linen cloth, giving him quite the air of mystery and discretion. I introduced him to Junior by telling him that he'd been an only child for long enough and would he like to meet his new brother. He looked alarmed for a second and enquired whether he'd need to share his inheritance with the new arrival; reassured that he wouldn't, he welcomed him in anticipation of baking time next week...

Herman's schedule was based around a ten day cycle. I followed this for the first week but then, not having access to a decimal week, I decided to train him to adapt to a seven day cycle - I can't be doing with baking on different days each week

He gets fed twice a week - one cup each of sugar (I mostly use demerara), plain flour, and milk (I use soya milk). After the second feed he is split into four equal parts: one to keep for next week, one to bake, and two to give away to any willing victim you can find. I have had some success with the Brazil Nut, although she was rather worried about caring for him all week. In the end I pointed out that I can just give her a portion every week and she can go ahead and bake it, and this seemed to her to be an excellent arrangement. If I don't have a recipient for the second giveaway portion, I just make two cakes...

The new arrival


Feeding time at the zoo


All full up


The mixture for my first bake - oil, flour, raisins, baking powder, sugar, eggs and two apples (which I loosely interpreted as meaning 'any old fruit that's lying around and needs using up' which explains why you can see apple, pear and chopped up grapes, one of which looks a bit like a slice of leek but isn't, I promise.


The recipe instructed me to scatter sugar on the top of the cake then to chuck melted butter on before baking. As I would be turning my cake out of the ring mould, I bunged some sugar and butter in the base. Turned out the butter was irrelevant but the sugar has been a constant fixture in subsequent bakes.


Just out of the oven


My First Herman


A slice through an apple and cinnamon delight


His second incarnation, banana and blueberry


Number three - coconut, lemon and apricot


Number four - a reprise of apple and cinnamon


And number five - ground almonds, grated apple, dates and ginger

Sunday 8 April 2012

Τσουρέκι time

I made my first τσουρέκι (tsoureki) a year ago. My correspondent in Athens had sent me a marvellous parcel of goodies which included packets of μαχλέπι (mahlepi) and μαστίχα (mastic) and a copy of a recipe for tsoureki. Mahlep is a spice made from the ground kernels of cherry stones and is like nothing else I've ever used. Mastic is a piney resin with a very distinctive taste. Both are used as flavourings in Greek cuisine and both are traditionally used in making tsoureki. It took me a little while to get around to making my tsoureki as I had to translate the recipe first and it had been a while since I'd tackled any Greek - in addition, most mysteriously, the already-tiny text in my pocket Greek dictionary had shrunk to almost unreadable proportions. Tsoureki is a plaited brioche-like bread that is traditionally made at Easter, and we liked it very much indeed.

As it's Easter again, it must be τσουρέκι time, so I pulled out the mahlepi and rolled my sleeves up. This time I chose to follow Vefa Alexiadou's recipe in my enormous cookery book, and this included chocolate, orange peel and almonds inside along with the almonds on top that I'd gone with last time.

I made up the dough with mahlep and orange peel, then after its bulk fermentation, rolled it out and cut it into three strips. These I filled with plain chocolate drops and slivered almonds, then rolled them up ready for their hairdo. I made two three-strand plaits and left them to prove in a warm place. When they were ready, I eggwashed them and sprinkled with more slivered almonds. After cooking, the loaves were very dark, darker than I'd normally like, but many of the images and illustrations of this bread shows a very dark finish.

They were delicious, the orange peel coming through nicely with the mahlepi, and the fillings adding pockets of extra yumminess. Overall, I found the bread on the dry side, which was a nice excuse for spreading it with butter. Next time I think I'd add a spot more butter into the dough.


Sunday 18 March 2012

Going Dutch

I have a fan oven. It's quite enthusiastic. It huffs and it puffs and it makes your bread brown. Dark brown, you know, the dark brown with lots of carbon in it. Even adjusted for fan-ness, at the right bread-making temperature my loaves were all turning out darker than I wanted. I was also finding that my loaves lacked in the oven spring department because introducing baking stones (well, granite chopping boards) had necessitated a rearrangement of oven shelves which meant that there was no room for a steam tray, and the quick-grab-the-spray-and squirt-through-teeny-gap-in-the-door-without-letting-too-much-heat-out approach never seemed to work brilliantly.

One option would be to buy a reconditioned rack oven and convert the garage into my own dream bakery. But, back on planet Earth, I looked for a slightly easier solution. I read about Dutch ovens - a cast iron casserole with a tight-fitting lid would create the steamy atmos I wanted, while at the same time ensuring an even heat distribution and protecting it from burning. I looked online for likely candidates, while Tallboy carefully measured inside the oven. I flirted for a while with this large specimen from Lakeland, but finally lit on this fine example from Ikea, and its friend.

I've been using them for a couple of months and I'm really pleased with the results. I put them into the oven before I turn it on, so that they heat up gradually. I decant the proved loaves from the banneton straight onto a piece of silicone liner, then drop this gently into the hot casserole, slamming the lid on quickly to keep in the heat and steam. I bake at my normal bread temperature (230° C, or rather 210° C in my oven) and leave the lids on for 20 or 25 minutes, then complete the bake topless, leaving the lids on the hob. This gives a lovely rise during the first session, and much better browning during the second. During my initial recuperation from the car accident when I couldn't lift, Tallboy and I got quite good at the ballet sequences involved in my opening the oven door and his removing/replacing the casseroles, but since his motorbike accident coincided with the return of my ability to lift things it's a solo effort nowadays.

Some observations about using a Dutch oven for baking bread:

  • Maximum of two loaves at a time - I could do four direct on the baking stones.

  • I made sure that the handles on the lids were cast iron too, rather than plastic which might not have been so happy at high bread-baking temperatures

  • They get hot. I mean really hot. Seriously hot. So hot that I have hurt myself simply by touching the outside of the oven gloves I used to get them out of the oven.

  • I haven't yet gone to pick up a discarded lid with bare hands to tidy it away while still searingly hot. But I fear that one day I will.

  • They don't do so well if the loaf is small - it needs to take up a decent volume inside the casserole or it will pancake.

  • I have found that the round one works best with my 500g round bannetons, and the oval one with my 1kg oval banneton.

  • You can use baking parchment to decant the proved loaves onto but it chars after a few times in the oven.

  • Having cast iron casseroles in your batterie de cuisine makes you feel strangely grown up.

  • They have helped me produce loaves of which I'm really, really proud.

  • Baked on flour residue makes for an attractive spotty finish on the lids. Or so I tell myself.

  • The oval one is bigger than the round one. It won't fit on the bottom of the oven, no matter how many times you try.


Here are some pictures from some of today's batch (50% stoneground spelt, 50% strong white)

Silicone liner for decanting proved loaves


The big oval casserole


After twenty minutes - beautifully risen but pale as you like


After another fifteen or so minutes, now with crust


The smaller round casserole


After twenty minutes


At the end of the bake


Round loaf sitting up and looking pretty


Both loaves

Saturday 10 March 2012

No, not like the Italian dictator...

This week's first-time-make was a cream mousseline topping and filling for a coffee and walnut cake. Delia told me to do it.

Tallboy had watched Masterchef yearningly the day before and having seen a parade of patisserie, had evinced a deep longing for a coffee and walnut cake. He then buggered off for the day to give me space to roll up my sleeves and get baking. Indeed, he timed it so well that just as I heard his key in the lock, the oven started beep-beep beep-beep beep-beep to tell me to get the cakes out.

As I had doubled up the cake mixture, I decided to double up the topping/filling too. It seemed only fair. The trouble with doubling things up in your head isn't the simple things like using 120g of sugar instead of 60g. It's when you try to get clever with tablespoonsful and translate them into ml and then into other measurements. Being lazy, I'm not keen on repeated small actions. I'd rather do a single action. That's why I wrote all that code at work, so that I could achieve in a single click what it would otherwise take minutes or even hours of clicking to do. So if a recipe wants 4 tablespoons of something, a quick multiply by 15 gives me the total ml, then I wrestle the appropriate cup measure from the hook and Bob's your uncle - a single measurement. I needed 4 tablespoons of water, 4 x 15 = 60ml. Except of course that I was doubling up, so make that 8 x 15 (or 4 x 15 x 2) = 120ml or half a cup measure. Brilliant. So when I go to make the sugar syrup, I have half a cup of water in my brain. I mean the idea of using half a cup of water, not hydrocephalus. Right, one half cup of water into my pan, and then another, because I'm doubling up, right?

My second deviation from the optimal was employing my old sugar thermometer. There's nothing wrong with it, it has been my trusty friend for decades. But it was a small pan, and the liquid wasn't very deep so the bulb wasn't covered. And I had to identify a temperature of between 103 and 105 °C, an operation which involves a fair bit of squinting and face-screwing-up. Had I thought about it instead of reaching automatically into the drawer for the old-fashioned kit, I'd have used my super duper digital thermometer with the probe.

The sugar syrup needs to boil gently for ten to fifteen minutes until it reaches the right temperature. At about minute 14 it suddenly struck me that I'd used too much water and that I needed to ditch this batch and start again. A further 15 minutes down the line, I was squinting through the steam and deciding that the temperature was approximately between 103 and 105 °C and this surely would be ok.

The trick was now to pour the syrup onto the egg yolks in my mixing bowl in a continuous stream while I carried on whisking with my other hand. As I poured and continued and whisked, the mixture seemed dreadfully thin and not at all cake-coating consistency. In fact, I put the pan down for a few seconds so that I could go back to Delia to check that it was actually yolks I needed - had I managed to get an Italian meringue dreadfully wrong? Delia told me that it was yolks and to get on with it.

Now I pinched bits off the unfeasibly huge amount of butter I had weighed out and whisked them in. With my right arm wilting, I decided to apply the right kind of technology and brought my electric whisk to bear, which made things much easier, but the consistency wasn't changing any. *pinch* *drop* *whisk* Is this right? *pinch* *drop* *whisk* This can't be right *pinch* *drop* *whisk* I'm just going to do a buttercream when I abandon this *pinch* *drop* *whisk*

All the butter was now in the mix but there was no way that it was going to cover the cake for more than a second or two before it succumbed to combination of gravity and its own low viscosity. I kept the whisks going while I leaned over to scan the recipe again. Yes, I'd included what was required, and done what Delia said. Maybe the temperature hadn't been quite right. Maybe I could do with reading glasses nowadays. Maybe I'd been right the first time with the water. I turned back to the sloppy contents of the bowl and regarded them idly as I wondered what I should do. It was then that The Miracle happened and all of a sudden I had a workable cake topping in front of me. For a moment I thought the mixture had split or something similarly awful had come to pass, and turned the whisks off. I realised that all was ok and bunged in the coffee quickly before it changed its mind. A further tentative whisk and I had a perfect coffee-coloured and -flavoured cream for my cake.

I filled and topped (and sided) the cake, perching some half walnuts on top for a hint at the contents. The bowl scrapings were delish - very creamy but light and not too sweet. I was really impressed and very happy with the outcome, and glad that I'd kept whisking beyond what I'd thought was a sensible point.

Offering a slice to Tallboy, I tried to explain the trials I'd been through to satisfy his craving. I told him that I'd never done this kind of topping before, not a standard buttercream but a mousseline. "Oh," he said through a mouthful of crumbs, "like the Italian dictator?"


Tuesday 6 March 2012

Beware of Greek bread that doesn't lift

I am determined not to be beaten by this eftazimo. I will make some that turns out all right. I might be 90 by the time I manage it, but I will.

I decided to try Vefa's recipe again, but this time to go for a much looser dough. I achieved that, at least. Much, much looser...

This time I was excited to use my new, specially-purchased-for-pounding-chick-peas pestle and mortar. It's huge and solid and spectacularly therapeutic when it comes to crushing the innocent. It's an absolute monster, weighs half of what Junior did when he was born, and was going to be much more fun than the coffee grinder. With not much effort, the chick peas crumbled at my knees. Well, they split in half and discarded their skins. On the downside, I had to be very precise when attacking them, and give each one its own doink - It's pretty impressive how far a mis-hit chick pea can ricochet round the kitchen. On an entirely unrelated note, stepping on a partial chick pea in stocking feet is not an experience one wishes to try more than once. Or even once, really.

I was left with mostly-in-half chick peas, which I decided was probably ok. I put them in my kilner jar with some salt and boiling water, wrapped it in a towel and left it in the cosy airing cupboard for 25 hours, having alerted the boys that it was meant to be there and didn't need rescuing. After its sojourn in the airing cupboard, the jar showed evidence of extreme activity although the froth that was left wasn't much to write home about. It had clearly risen very high up the jar in a desperate attempt to escape its fate, so I am sorry I didn't peek earlier and rescue it then.

I decanted the froth and the juice and mixed it with a tablespoon of sugar and some of Shipton Mill's finest. Something made me put it in a bigger bowl than last time. A plastic hat, then back in the airing cupboard with it. I did peek this time, just before bed, and saw to my horror (ok, deep joy) that the stuff was almost fermenting its way out of the bowl. I scooted downstairs and decanted it into a bigger one to make sure it couldn't escape. In the morning, it didn't look much different, it hadn't grown any and if anything had fewer bubbles. I think I missed the bus on this one again.

The next morning I wasn't ready to use it, so I gave it a spot of breakfast to keep it going and then made up the dough later on that afternoon. I was more liberal with the water this time and in complete opposition to the tight little mass I made last time, I had the sloppiest slappiest dough which I worked the Bertinet way because there wasn't anything else I could do with it.

I left it to prove in a couple of round bannetons in front of the radiator. I watched it like a hawk but couldn't see any movement apart from when one blew a huge bubble at me in a sticking-out-its-tongue fashion. I decided to bake one on a granite slab in the oven, and one in my smaller dutch oven. Neither of these turned out to be a particularly good idea. The one on the stone spread and spread and didn't look like it would ever stop. 'Pancake' is what came to mind as I peered forlornly through the oven window. The one in the dutch oven didn't fare much better.

Again it has been popular with the boys, so it's not a dead loss. It's just galling that getting the chick peas fermenting seems from the write-ups to be the difficult bit, and that is happening for me. It's what I do afterwards that is drenched in fail.

Next time I am going to be guided by Paula Wolfert so you never know, I might have something neat to show you then...

Behold the power of my granite monster


I'm not sure this adds a great deal, I just quite liked the photo


It didn't seem to smell as weird this time. Maybe I'm getting used to it.


Conclusive evidence of an attempted escape


This wouldn't look any different in 3D


The one on the right looks like a cross between a drop scone and a dodgem car


A valiant attempt at bubble formation