Showing posts with label recipe. Show all posts

Saturday, 11 February 2012

Tie your mother down

Let me tell you about my mother. She lives in my fridge and comes out once a week for dinner. The night before a baking session she sits on my worktop all night, then heads back to the fridge again. I know that some take issue with calling sourdough starter a mother, but 1) it gives you the chance to exclaim 'Oh! I must feed my mother!' and 2) I tend towards Clive Mellum's idea that calling it a mother makes it sound kind and friendly and not scary. Because for a while, it all did seem rather scary.

Resolving after my Bertinet day last year not to buy bread again seemed like a big decision and it wasn't without trepidation that I rolled up my sleeves and faced the prospect of the weekly bake. As the weeks went by, I became more confident and more interested in extending my repertoire. Sourdough was the obvious next step but the trepidation levels mounted as I read about the trials and tribulations of creating a starter, casting half of it away, feeding and nurturing it, and finally performing the alchemy of loaf creation. Much of the advice appeared to contradict the rest - type of flour, temperature, quantities, other ingredients, discarding or not discarding. Having informed myself extensively on the internet, I finished up feeling that I knew less then when I knew nothing.

A friend recommended the River Cottage method of creating a starter, so I looked around and found it here. Taking a deep breath, I boiled the kettle and readied my strong white. Not being at all confident how it was going to turn out, I took a note of what I did and recorded how it looked, so that I'd have something to refer to next time.

So, here's what I did.

Monday

In a pudding basin, I mixed up
50g Wessex Mill French Bread Flour
50g Stoneground Rye flour
warm water to mix

I behatted the bowl with clingfilm and left it to do its stuff in the airing cupboard with a whisper or two of encouragement.


Tuesday

As I peeked into the airing cupboard I saw with great joy a bit of a fizz on top of the mixture.

50g of the French Bread flour
50g of the Rye flour
cold water to mix

Again with the clingfilm but I left the bowl on the worktop to continue the process at ambient temperature now that it had 'taken'.


Wednesday

I discarded half the contents of the bowl and decanted the rest into a plastic box with an airtight clippy lid.

100g French Bread flour
cold water to mix

I clipped the lid onto the box and left it on the worktop.


Thursday

Froth-a-rama! I discarded half again (you have no idea of the mess it made in the take-me-to-your-composter box).

100g French Bread flour
cold water to mix

Then back to the worktop.


Friday

Again with the discarding.

100g French Bread flour
cold water to mix

Again with the worktop.

I didn't take a photo this day, so instead here's a picture of a wrought iron flower in the grounds of the Château des ducs de Bretagne in Nantes which I took the week after.


Saturday

Discard.

100g Shipton Mill Baker's No. 1 Strong White flour
less cold water than previously

Worktop.


Sunday

Discard.

100g Shipton Mill Baker's No. 1
less cold water to mix

And now the starter moves to its new permanent home, the top shelf of the fridge, where it lives during the week and is woken, like a fairy tale princess, every Friday ready for the weekend's baking.


Worktop.


If you're thinking of starting a starter or mothering a mother, then I urge you to just give it a go. It doesn't always work but it's easy enough to do it again. I keep my three mothers in the fridge and feed them weekly, it's not at all onerous or difficult and every weekend I make the most amazing bread with them. Huzzah for mothers!

Wednesday, 28 September 2011

Catching my eye

Perusing the list of events over at the Real Bread Campaign, I spotted 'The Eye Bread Festival (Herefordshire)' and wondered about going. It wasn't exactly on the doorstep, but with stalls and demonstrations and so on it seemed worth a look. Googling for some more information, I found some about the previous year's inaugural festival, but very little about this one. We decided to take a chance on going up there (via Cardiff - for unrelated reasons - across our second choice of Severn bridge) and arrived at about 1ish to find the day in full swing with band playing, bakers baking and corn dolly man corndollying for all he was worth.

It was £3 each to get in, but there was free entry upon presentation of a loaf of your own home-baked bread. Sadly this detail hadn't been included in the information available on the web, so we were a bread free zone. I offered to show the lady a photo of one of my recent loaves, but for some reason this chicanery wasn't acceptable and we had to fork out the sick squid.

In the main room were several stalls - some very interesting but-far-too-easily-melted-on-the-long-journey-home flavoured butters (note to self, take insulated bag next time), some delicious looking but sadly made-with-animal-rennet cheese, some amazing chutneys and relishes, oodles of honey and beer, and a bookstall heaped with books about bread and bread making, and a very interesting book about building your own wood-fired bread oven. I called Tallboy's attention to it, and while he agreed that it was an interesting intellectual exercise, he flatly refused to contemplate actual construction. The book remained unbought, despite the best efforts of the brace of persuasive booksellers behind the stall.

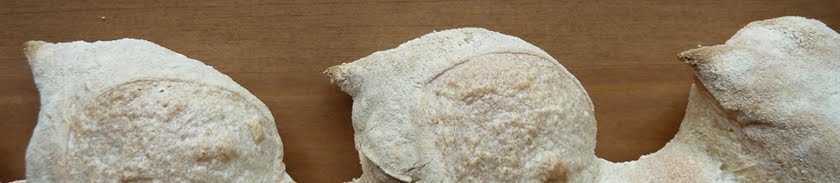
On the central table were examples of people's baking - a harvest sheaf, some school children's imaginative output, and the home-baked loaves which had gained their creators free admission. No, it's not rankling at all. Honest. A couple of them were an unusual shape that I'd not seen before, and I wondered if they were a special type of bread, but I realised after a while that they were cylindrical because they had been baked in a cake tin. I rather liked them.

Further on, out past the bar and the tea room, were the other delights on offer. A pizza wagon with its own wood-fired stove, a band, a display about bread and bread making over the years, the corndollyist, Victorian girlpower butter churners (we really should have taken an insulated bag), a stall selling an interesting range of flour and a demonstration area with shiny stainless steel workbench. As we milled around a bit between areas, a gentleman waved an A4 sheet in my general direction and offered me the chance for a mere fifty pence to participate in a quiz, the prize for which was a £10 book voucher. Muttering that I wasn't from round these yer parts, I declined - but he said this was no problem and that by simply placing my telephone number at the top of the page I could still participate without problem. Some of the answers I pulled out of my head, and others (such as the length of service of an apprentice baker in medieval times, of which fact unaccountably I was not cognisant) I gleaned from the helpful display.

I bought two bags of flour: Bacheldre Watermill's Stoneground Strong Malted 5 Seed flour (sunflower seeds, pumpkin seeds, golden linseeds, sesame seeds and fennel seeds), and Stoneground Rye Flour. The additional 3 kgs in my bag did get in my way a bit when I tried to take photos so I had no option but to hand it to Tallboy for the rest of the visit. Ho hum. I also bought some pots of What A Pickle's Red Onion Marmalade and tongue-tingling Roasted Red Pepper and Chilli Jam just to up the weight stakes even more.

A stir of excitement in the demo tent forewarned us that something was about to happen, so we plopped down on a pair of seats with a good view of the demonstration station. We were rewarded with an hour of excellent demo and commentary from Peter Cook of Price's bakery in Ludlow. Peter showed two types of dough - sourdough and a packet breadmix made up with beer as the only liquid.

Peter brought along a pre-fed sourdough mother which he used to make his dough, but he had also brought along a recently started mother to help him explain how you got things going. Throughout his demonstration he was happy to take questions from the growing crowd, and gave commentary and background and insights. I was surprised at first by the response to his weighing the liquid instead of measuring it against the scale on the side of the jug, but then remembered back to my day in the Bertinet Kitchen and how alien it felt to be weighing and not measuring by volume. I hadn't considered that the scale on the side of the jug wasn't desperately accurate, and it took me a while to break the habit.

Once again, I was able to sit back and appreciate the pleasure that there is to be had from watching an expert do what they do best. Peter's handling of the dough was magically understated but without fail it did what he wanted it to. He went on to mould and shape the dough in various guises, again without apparent effort but always with an impressive result.

Peter was kind enough to share his recipe for a sourdough dough with us, and even kinder to give me permission to reproduce it on the web - which I propose to do here (I noted the quantities at the time on my phone, so any errors in the following will be mine)

650g strong white flour
200g stoneground rye flour
100g stoneground wholemeal flour
390g sourdough mother
530g water
25g salt

He recommended leaving the mixed dough for 30 minutes before adding the salt. Mother can be included at the lower value of 10% where it's being used for flavour only with the leavening provided by fresh yeast. I'll be trying this recipe tomorrow.

Laden down with our purchases, we repassed the book stall where we resisted the lure of the build an oven book, pausing only to deposit our completed quiz form at the door and take a photograph next to the village sign. There was no way I could pass up an opportunity like that...

And that was it for the Eye Bread Festival. Except that there was a message on my mobile a day or so ago, kindly informing me that I'd won the quiz and could I please provide an address for the voucher (valid for Border Books in Leominster). The book on building your own wood-fired bread oven was a tenner. And it was on the Border Books stalls at the festival. And they still have it in stock. Looks like I was meant to get it after all...

The mouse is definitely the Best Bit


A caterpillar family showing some interest in a flower


The home-baked loaves


It had to be done, really...


Thursday, 22 September 2011

Sourdough pretzels

A chum pointed me towards a recipe which uses up unfed sourdough mother - if you discard before you feed, then it does seem a terrible waste. And if you don't discard, it's nice to be able to use a bit up spontaneously, without having to decide the day before what you're going to make.

The recipe I looked at first is Sourdough Beer Pretzels, which looked brilliant. Reading through it, I saw the attribution for the original recipe, and followed the link through to King Arthur Flour. Delicious though the beer version sounds, I decided to go with the original for my first attempt at pretzels (why do I keep wanting to call them bagels?). I adapted the recipe a little to my own taste (find the original here):

3 cups strong white flour (Shipton Mill Baker's No. 1)
3/4 cup warm water
1/4 cup natural yogurt
1 cup sourdough mother (unfed)
1 tbsp olive oil
good pinch of salt
6g fresh yeast

wash made from 1 tbsp caster sugar dissolved in 2tbsp of warm water (I didn't use it all when it came to it)
Cornish sea salt to sprinkle over

I combined all the dough ingredients by hand in a bowl and worked the dough until silky. It was pretty sticky (perhaps I should have added a tiny bit less yogurt?). I left it, covered, in the bowl for 50 minutes or so, then turned it out and divided into a dozen pieces.

I rolled each piece into a long sausage (the target was about 18"), which wasn't as easy as you might think. I had many breakages and adhesions on the way. Finally I looped them around and tried to arrange in a pretzel shape, in some cases going for a poncy double twist. Once safely on the tray (I reckoned if I peeled them in the shape would be even more distressing that it already was) I brushed with the wash and sprinkled with salt. Way, way too much salt.

They then went straight into an oven at 180°C for 20 - 25 mins (top tray out at 20 mins, bottom one to the top for another few mins).

They smelled amazing when they came out, and I was willing them to cool so that I could try one. I wasn't disappointed - a beautiful chewy texture, wonderful flavour, delicious crust. Really, really good. Definitely going to try these again, not only because I clearly need the shaping practice, and I think there's room for a bunch of little modifications here and there. Next time I'll try my smoked sea salt on top.


Tuesday, 30 August 2011

Lemon rolls

Actually, these are what Junior initially wanted when he looked through Dough, but we didn't have any lemons in, so the bagels were the next choice. Lemons are now in stock, so it's lemon roll time.

You just need a 500g-of-flour batch of standard white dough and a couple of lemons. As you get to the end of your time working your dough, zest the lemons (I used my 5-holes-on-the-end-of-a-handle-like-a-peeler's-got zester to get wider strips rather than a little pile of shavings type zester) and work the strips through the dough as you finish it off.

Leave the dough to rest as usual, then divide into balls and after a rest of a few minutes, shape into lemon-shaped rolls and leave to prove on a pleated couche. Transfer onto a floured peel, score the tops (if you're me, you'll do it horribly cack-handedly while retaining hopes that you'll get the hang of it one day) and bake for about ten minutes.

It was in the transfer from the couche to the peel that my little board came into its own - manipulating the little puffed-up rolls just by hand is hard to do right, but it's so easy to roll them onto the board, then roll them off the board onto the peel. Hooray for the board.

These rolls have a wonderful lemony scent and taste fabulous - I was amazed at how much difference the addition of a tiny amount of another ingredient made. I let myself into the Brazil Nut's empty house and left a few of them on the worktop for her (I normally do this with a fougasse or similar) and she loved them too. I'll definitely do these again.


Sunday, 21 August 2011

Mum's Sticky Black Gingerbread

This was a family favourite from as far back as I can recall. It has a wonderful deep rich smell as it's cooking, and a gorgeous gingery moistness when you eat it. The top is crispy with a hint of tackiness, and if you keep some of the gingerbread wrapped up in the parchment and sealed away from the air in a container or wrapped in foil, you'll be rewarded in a week or two with a glorious stickiness as it matures.

The original recipe is in old-fashioned units, I've added the metric approximations that Delia uses so hopefully they'll work!

Ingredients:

8 oz (225 g) black treacle

8 oz (225 g) butter

8 oz (225 g) soft brown sugar

2 beaten eggs

12 oz (350 g) plain flour

2 dsp ground ginger

2 tsp ground cinnamon

pinch of salt

2 tsp bicarbonate of soda

10 fl oz (275 ml) milk

Method:

1. Preheat oven to 150 C. Line and grease a deep-sided tin approx 7" x 11" (18 x 28 cm) (ungreased parchment paper works fine).

2. Put treacle, butter and sugar into a saucepan. Stir over gentle heat until melted together, then remove from heat.

3. Beat eggs and stir into mixture. Sift flour, ginger, cinnamon and salt into mixture and stir in well.

4. Warm milk to blood heat. Put bicarb into a bowl and pour the milk over. Stir quickly and thoroughly into the saucepan, Pour mixture into tin.

5. Bake for 1 1/2 hours and cool tray on a wire rack.


When I'm making this gingerbread, I like to throw in some extra ginger if I've some handy - either chopped crystallised ginger, or freeze-dried work really well.


Saturday, 30 July 2011

La Schiacciata con l'Uva (flatbread with grapes)

A big thank you to Fattoria La Vialla, who have kindly agreed to my reproducing the recipe from Le Ricette di Giuliana here.


La Schiacciata con l'Uva

Ingredients (for 6 to 8 people)

1 kg fresh, large and firm red grapes (ideally!)
500g flour
20g fresh beer yeast (or 1 tsp. quick dried yeast)
9 tbs extra virgin olive oil
8 tbs sugar
1 tsp salt

In a mixing bowl, dissolve the yeast in a little tepid water (about 1/2 glass) and, stirring continually, add the sieved flour a little at a time, adding more tepid water (about 1 glass), 4 tablespoons of oil, 4 of sugar and the teaspoon of salt (if you use quick dried yeast, then just mix it in with the sieved flour). Knead the dough well after having transferred it to the floured table; it should become soft and elastic. Leave it to rise for about an hour in a warm, sheltered place, covered with a teacloth.

To check if the dough has risen, press the dough your finger: if it doesn't leave a dent, then it still needs to rise a little bit more, if it forms a permanent mark, almost a hole, then it is ready. After this time, on the lightly floured working surface, knead the dough a little more and roll it out with the rolling pin into a fairly thin, more or less rectangular sheet, almost double the size of the baking tray. Grease a rectangular baking tray (measuring about 25cm x 35 cm) with a tablespoon of oil and line with the dough, allowing the excess to hang over the edges of the tray. Spread over it three quarters of the destalked, washed and dried grapes and then sprinkle over the two tablespoons of sugar and two of oil. Fold the excess dough over the top of the grapes, in such a way that they are almost completely covered.

Scatter over the top the remaining grapes, pushing them down into the dough a little with the tips of your fingers and sprinkle with 2 tablespoons of sugar and 2 of oil. Bake the schiacciata in the oven preheated to 180°C for 20-25 minutes, then lower the temperature to 150° and bake for at least another 15 minutes. If it should begin to brown too much, cover it with a sheet of aluminium foil until it has finished cooking. Serve the flatbread tepid or especially cold cut into small squares.

This exquisite flatbread is to be found most of all in Florence, although also in Siena and Arezzo, in so many bakeries, ready to eat. It has very old origins: it was prepared with the leftovers of the bread dough and the ripe grapes, at grape harvest time. It is a recipe which is a mix of sweet and savoury, very nutritious and, I would say, "Mediterranean". For perfect results, it is indispensable to use "real" grapes, even if they contain the inconvenience of the seeds; in any case, a version without this "bother" could be to substitute the fresh grapes with raisins (no seeds!) after having soaked them in warm water for 5 to 10 minutes.


The first time I made this, I did it exactly according to the recipe. Subsequently I've done my own thing in a few respects:
  • I found using a whole tablespoon of oil to grease the tray, and extra oil with each layer made the finished bread too oily for my taste, so I use a tiny bit to oil the tray and don't add any after the grapes. I still use it in the dough.

  • I guessed at half a glass being about 100 ml and a glass being 200 ml. This seems to work!

  • I found that I preferred using fewer grapes (maybe 500 or 600 g) so that they were more spaced out in the bread, and using half for the middle and half for the top.

  • I make and work the dough according to the Bertinet method rather than as specified here.

  • I use standard strong white bread flour.


It is desperately satisfying to push the grapes in!